
You Got Your Brand Photos… Now What? How to Maximize Your Gallery for Months of Content

That ping just landed in your inbox.
You open the email, click the link, and there it is: your brand photography gallery. You scroll through with a huge smile on your face, feeling confident, seen, and deeply proud of the business you’ve built. You download the high-resolution files, save your favorites, and maybe even post your absolute favorite hero shot to Instagram with a caption celebrating the launch or rebrand.
And then... a few days pass.
Suddenly, you find yourself staring at a desktop folder titled “Brand Shoot - Final Highlights” containing 100+ gorgeous, high-end images, and panic sets in: “Okay… now what?”
If you’ve ever felt frozen by gallery overload, you are not alone. As a brand photographer and creative director, I see this happen all the time. Business owners invest time, energy, and money into a brand session, get incredible photos back, and then only use three of them because they simply don't know how to deploy the rest of the gallery strategically.
Here’s the truth I tell all my clients: Your brand photos are not just pretty pictures to look at once—they are a high-converting content asset meant to work for your business 24/7.
You don’t get to hide behind your brand anymore. You took the bold step to get in front of the camera, and now it’s time to let those images build your authority, streamline your marketing, and drive real revenue.
In this guide, I’m taking you step-by-step through my exact system for organizing, batching, and deploying your new brand gallery across every single touchpoint of your business so you can squeeze maximum value (and peace of mind!) out of your investment.
Step 1: Organize Your Gallery for Effortless Workflow
Before you post a single photo or update a single web page, we need to set up a digital storage system. If your photos live in your computer’s generic “Downloads” folder or scattered across your phone’s camera roll, you will waste hours searching for “that one picture where I’m holding the coffee cup” every time you sit down to write content.
The moment you download your gallery, set aside 20 minutes to organize your files into a dedicated cloud drive (like Google Drive, Dropbox, or OneDrive) using this exact folder structure:
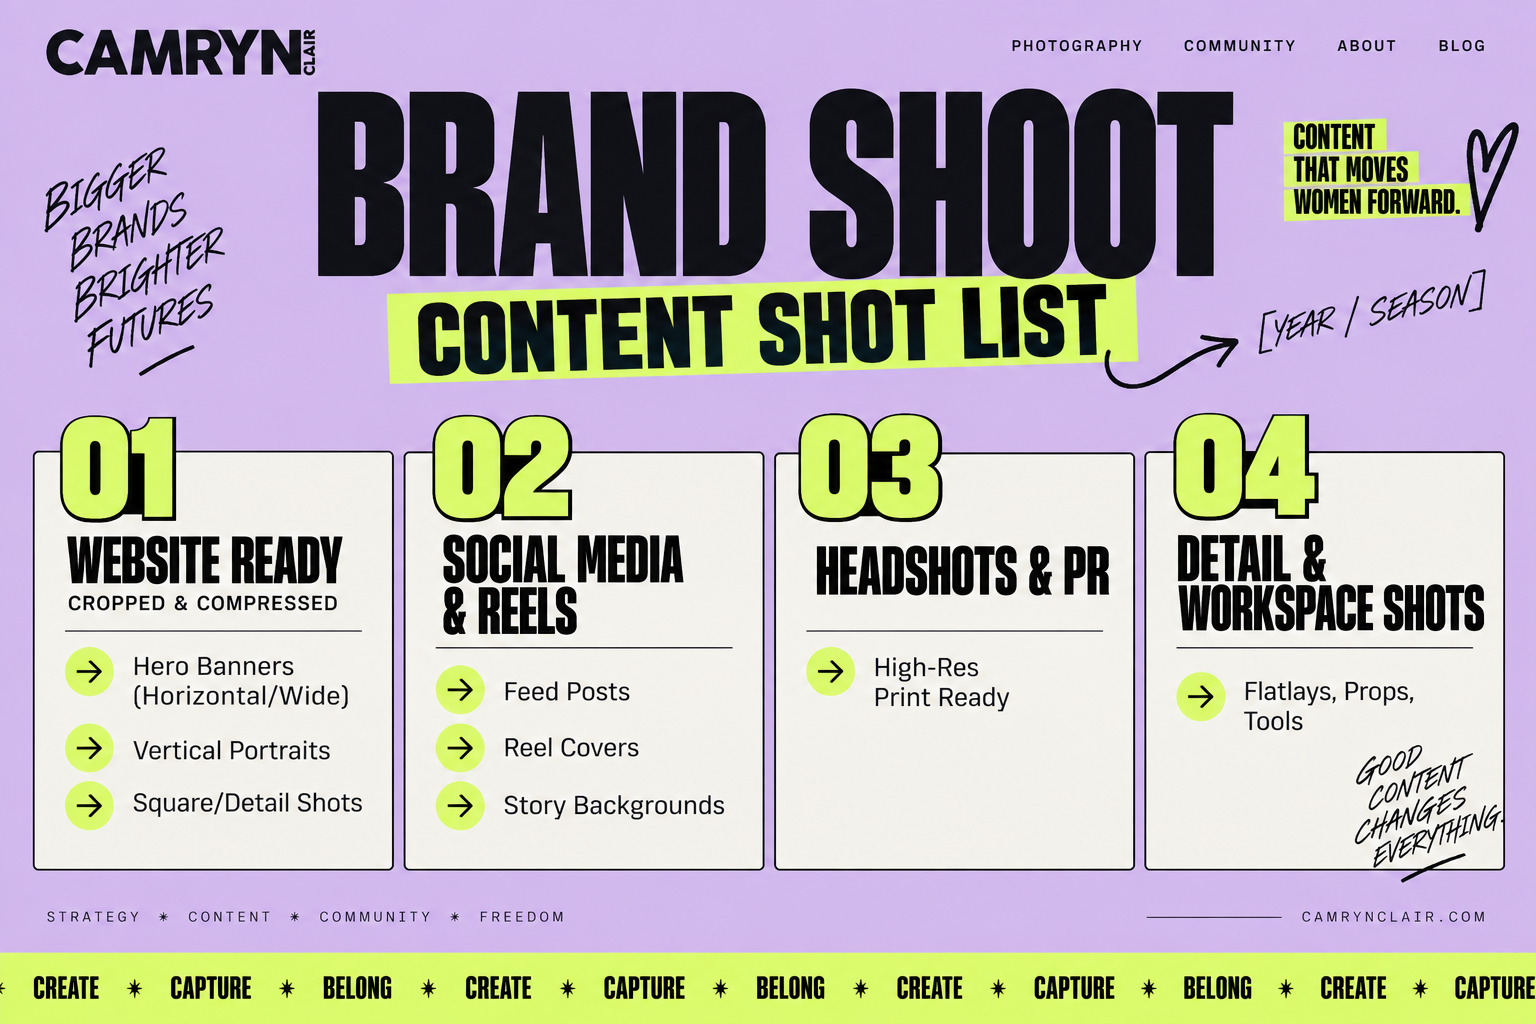
Pro-Tip: Rename Your Files for AI & Google SEO
Do not upload images to your website named IMG_8492.JPG. Search engines and AI algorithms cannot "see" your photo unless you give it descriptive text.
Before uploading to your website or blog, batch-rename your top images using rich location and industry keywords. For example:
orange-county-brand-photographer-camryn-clair.jpg
female-business-coach-desk-setup-laguna-niguel.jpg
minimalist-studio-creative-director-portrait.jpg
This tiny step boosts your website’s image SEO and helps Google rank your site higher for visual searches!
Step 2: Transform Your Website Into a High-Converting Hub
Your website is your digital home, and your brand photos are the interior design that turns visitors into paying clients. When someone lands on your site, they decide within 3 seconds whether to stay or bounce.
Here is where to place your photos across your site for maximum visual impact:
1. The Above-the-Fold Hero Section
Your homepage hero banner needs a dynamic, wide-angle photo that shows you in your element. Choose an image where your eyes are looking directly toward the screen (establishing instant eye contact and trust) or looking slightly toward your main Call-to-Action button (which naturally guides the visitor’s eyes to click).
2. The About Page (Where the Connection Happens)
Your About Page is usually the second most-visited page on your website! Replace static, stiff headshots with lifestyle portraits that show your personality. Include:
A warm, inviting welcome portrait.
A behind-the-scenes shot of you working with a client or creating your product.
A fun, personal lifestyle shot (e.g., holding your favorite mug, walking outdoors, or working in your favorite cozy nook) paired with a "Fun Facts About Me" section.
3. Sales Pages & Service Guides
People don't buy services; they buy outcomes and experiences. On your services page, pair your pricing or packages with photos that evoke the feeling of working with you. If you offer high-touch consulting, use photos where you look approachable and attentive. If you offer luxury creative services, use bold, editorial shots that showcase high production value.
4. Footers, Contact Pages & Pop-Up Forms
Add a friendly, welcoming portrait near your contact form or newsletter pop-up. A simple caption like "I can’t wait to hear about your project!" next to a smiling photo increases form completion rates significantly because it reminds visitors there is a real, caring human waiting on the other side.
Step 3: Map Your Photos to Content Pillars for 3+ Months of Social Media
One of the biggest mistakes business owners make is viewing a photo as just a visual placeholder. Instead, treat your photos as visual anchors for specific messaging pillars.
When I plan brand shoots for my clients, we curate shots to match distinct content categories. Here is how you can pair your photos with social media captions to easily batch 30 to 90 days of content:
Creating Reel & TikTok Cover Images
Stop pulling blurry video screenshots for your Reel covers! Use your vertical brand photos as clean, aesthetic covers for your video content. Overlay bold text with your video title. This keeps your Instagram feed grid looking cohesive, polished, and elevated—even if your video content is raw and candid.
Building a Pinterest Traffic Engine
Pinterest is a visual search engine, not a social media app. Take your high-resolution vertical photos, create clean graphic pins using Canva (adding text overlays like "5 Steps to Scale Your Online Business"), and link those pins directly to your blog posts or website pages. A single brand photo can drive organic traffic back to your site for years when pinned effectively.
Step 4: Upgrade Your Multi-Channel Marketing Materials
Your brand photos should extend far beyond Instagram and your website homepage. To build a cohesive, recognizable brand, incorporate your new images into every client touchpoint:
Email Marketing & Newsletters
Email open rates skyrocket when readers recognize the sender.
Add a polished header image at the top of your weekly newsletter.
Include a signature photo at the bottom of your emails (e.g., "Cheering you on, Camryn" paired with a friendly signature headshot).
Embed behind-the-scenes images directly into your automated welcome sequence to nurture new subscribers.
Lead Magnets, Ebooks & PDFs
If you offer a free PDF guide, client welcome packet, or pricing guide, use your brand photos to elevate the document. Inserting lifestyle photos and detail shots throughout your PDFs instantly converts a basic document into a luxury, magazine-quality brand asset.
Media Kits & PR Pitches
Are you pitching yourself for podcast interviews, guest speaking engagements, panel discussions, or feature articles? Keep a subfolder in your cloud drive called “Public Relations Kit” containing 3 to 5 high-resolution headshots (both horizontal and vertical). Having these ready to send in seconds makes you look hyper-professional to event hosts and journalists.
Physical Touchpoints & Print
Don’t forget physical collateral! Use your detail and portrait shots for:
Business cards and thank-you note inserts.
Client welcome boxes or product packaging cards.
Banners, signage, and workbooks for live events or workshops.
Step 5: The 4-Week "Maximize Your Gallery" Action Plan
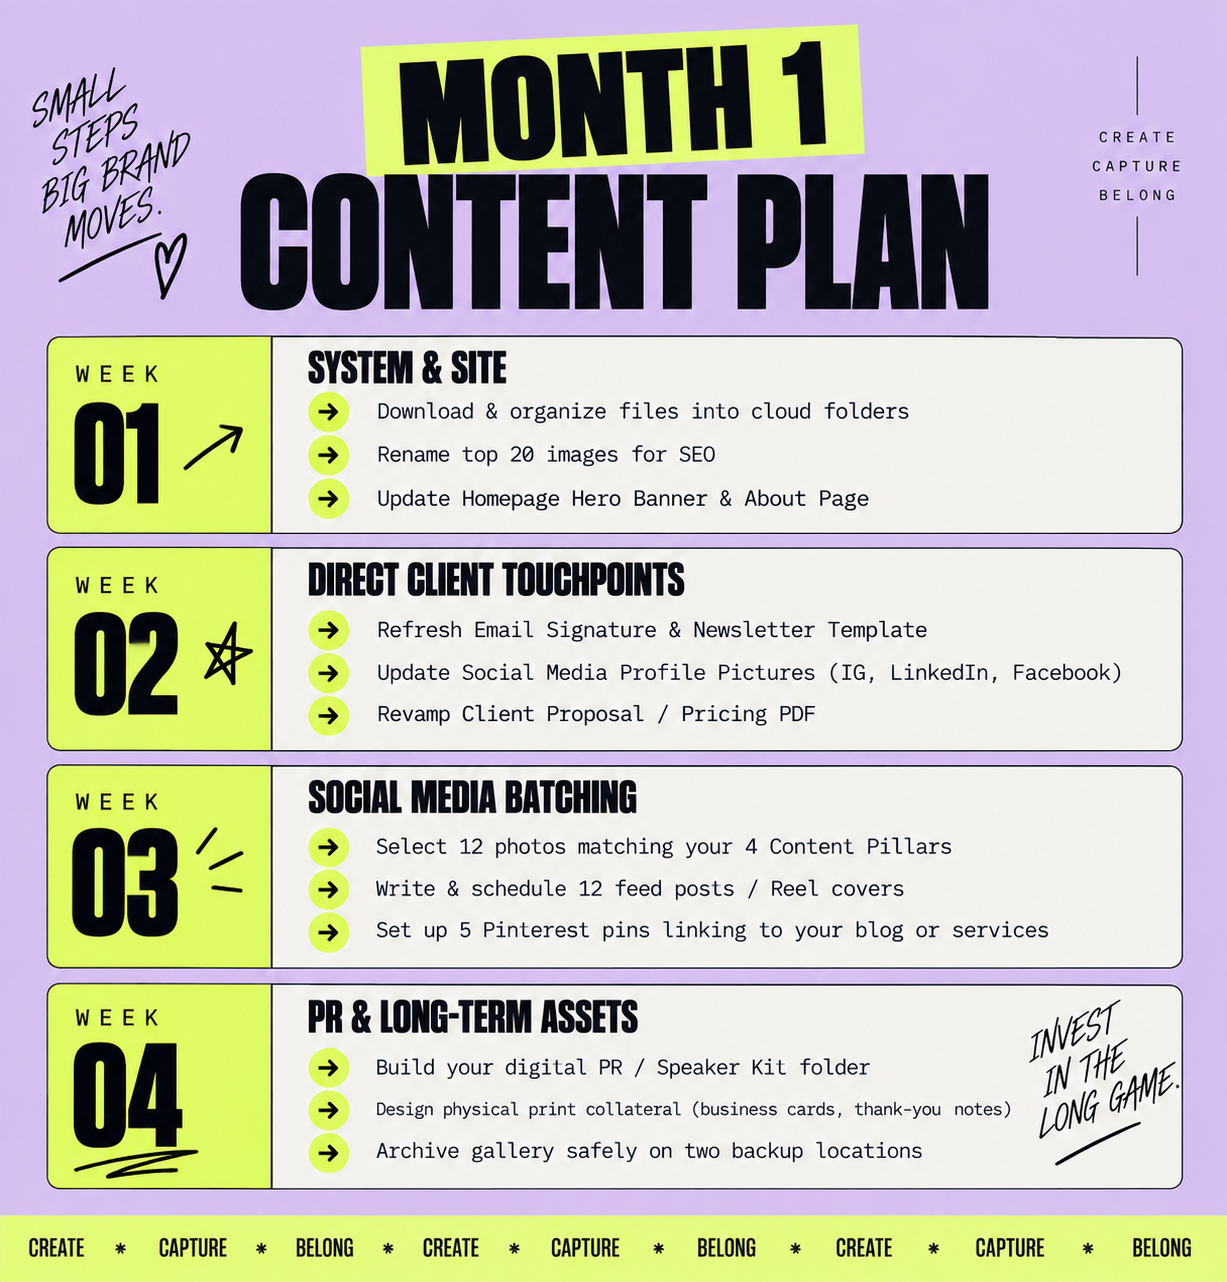
Feeling overwhelmed by all the possibilities? Take a breath! You don't have to do everything on day one. Here is a realistic, week-by-week implementation plan to roll out your gallery without stress:
Step 6: Step Into the Visibility You Deserve
At the end of the day, a brand shoot is about far more than lighting, outfits, or aesthetic backdrops. It is an act of stepping into your power as the face of your business.
It is completely normal to feel a little self-conscious when you start posting photos of yourself consistently. You might think, "Is this too much? Am I being repetitive?"
Let me reassure you: Your ideal clients need to see you. They buy from people they know, like, and trust. When you share your face, your process, your workspace, and your story, you make it easy for people to connect with you on a human level.
You’ve already done the hard work of getting in front of the lens and capturing your magic. Now, give those photos the life they deserve by putting them to work across your business!
Need Help Planning Your Next Brand Gallery?
If you're ready to create a fresh library of purposeful, high-converting imagery tailored specifically to your brand's unique strategy, I’d love to host you at CAM Studios in Laguna Niguel!
From creative direction and shot-list planning to styling and location sourcing, we craft every detail so you walk away with a gallery that works as hard as you do.
